You want the right part the first time and to avoid returns, delays, or damage. Start by using the VIN, OEM or part number and the vehicle’s exact year, make, model, and engine to match parts precisely. Cross-check those numbers with trusted online fitment tools, manufacturer pages, or a parts interchange guide before buying.
If you plan a swap or upgrade, verify physical and electrical connections, mounting points, and clearances so the part will work in your vehicle. When in doubt, confirm with a certified mechanic or dealership and test the part briefly before final installation to avoid warranty or safety issues.
Key Takeaways
- Use VIN and exact vehicle specs to find compatible parts.
- Verify fitment, connections, and clearances for physical and electrical match.
- Confirm with professionals and test parts to protect warranties and safety.
Understanding OEM, Aftermarket, and Performance Parts
This section explains who makes parts, how they match the vehicle, and what to check when choosing replacements or upgrades.
Differences Between OEM and Aftermarket Components
OEM parts come from the vehicle maker or the same supplier the factory used. They match the car’s original part numbers, fit without modification, and keep warranties intact. Buyers use OEM for safety systems, emissions parts, and when exact fit and factory calibration matter.
Aftermarket parts come from other manufacturers and can vary in fit, finish, and materials. Some mimic OEM closely and cost less. Others change design for cheaper production or improved performance. Aftermarket labels often list compatible makes, model years, and part numbers — compare those to the VIN or original part number before ordering.
Use a short checklist when deciding:
- Match OEM part number or VIN confirmation.
- Check bolt patterns, connector types, and mounting points.
- Read seller return and warranty policies.
Performance Parts Compatibility Considerations
Performance parts change power, handling, or emissions, so compatibility depends on the whole system, not just one part. An upgraded turbo, for example, needs matching fuel system changes, engine management tuning, and stronger cooling to run safely. Heavier-duty clutches require flywheel or transmission checks.
Check these specific items:
- ECU or tuning needs and whether the new part supports stock engine maps.
- Physical clearances: intake, exhaust routing, and intercooler fitment.
- Ancillary systems: brakes, cooling, and transmission capacity.
Consult vehicle-specific guides, tuners, and part fitment databases. When in doubt, pick parts listed for the same engine code and submodel.
Risks of Using Non-Compatible Parts
Non-compatible parts can cause poor fit, leaks, or sudden failures. Wrong brake parts reduce stopping power; mismatched sensors trigger check-engine lights and limp modes. Even a tiny difference in gasket thickness or bolt pattern can lead to oil leaks or broken mounts.
Safety and cost risks include:
- Voided warranties or failed inspections.
- Engine damage from incorrect timing, fueling, or cooling.
- Extra labor and parts for modifications to force a fit.
Minimize risk by verifying part numbers, using VIN-based searches, and asking a qualified mechanic to inspect fitment before installation.
Identifying Part Numbers and Cross-References
Part numbers are the single best way to verify fitment. They appear on the part, on paperwork, and in catalogs. Cross-reference tools map those numbers to equivalent OEM and aftermarket options.
Locating Part Numbers on Components
Parts often carry stamped, printed, or molded numbers. Check visible surfaces first: housings, flanges, and connector faces commonly show the full part number. Look for a mix of letters and digits, sometimes with dashes or slashes (for example, “12345-A” or “6L8Z-2C204-BA”).
If the part is dirty or faded, clean it gently with a rag and light solvent to reveal markings. For small parts, use a flashlight and magnifier. Save any labels, barcodes, or receipts that list a part or OEM number.
When numbers aren’t visible, remove the part only if safe and allowed. Record any casting numbers, date codes, or supplier logos. Those details help match the part in catalogs or with a dealer.
Using Cross-Reference Tools
Cross-reference tools accept OEM, aftermarket, or interchange numbers and return equivalent parts. Use reputable sources such as TecDoc-based lookups, major retailers’ fitment checkers, or VIN-search tools to reduce mistakes.
Enter the exact string shown on the part, including dashes and suffixes. If multiple matches appear, compare dimensions, connector types, and mounting points listed in the tool. Note any differences in materials or warranty terms.
Keep a short checklist while comparing results:
- Part number match (exact or interchange)
- Vehicle make/year/engine compatibility
- Physical specs (size, bolt pattern, connectors)
- Brand and warranty
Manufacturer Catalogs and Databases
Manufacturer catalogs list OEM part numbers and application notes. Use the vehicle maker’s parts catalog or an official dealer system to confirm the original part number tied to the VIN. These sources show revisions and superseded numbers.
Aftermarket manufacturers publish cross-reference charts and application lists. Verify those with the OEM catalog to catch superseded or incompatible listings. Many catalogs include exploded diagrams and torque specs that confirm fit.
Save catalog pages or export PDF entries for future proof. When in doubt, contact the dealer parts desk or the manufacturer with the part number and vehicle VIN for a final confirmation.
Assessing Fitment With Vehicle Specifications
Check the vehicle’s exact identifiers and the part’s listed fitment before ordering. Small differences in engine code, trim, or production date can make a part incompatible.
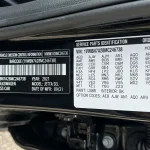
Interpreting VIN and Model Information
The 17-character VIN decodes key facts: manufacturing plant, model year, engine type, and transmission code. They can use online VIN decoders or dealership records to pull these values.
When a part listing accepts VIN input, enter the full VIN to filter results to exact matches. This avoids listings that only match broad model names.
Look for OEM part numbers and compare them to the number tied to that VIN. If a part listing shows compatible VIN ranges, confirm the engine/transmission codes match.
Keep a note of production month if available, because mid-year changes sometimes alter fitment.
Year, Make, and Model Matching
Exact year, make, and model form the baseline for fitment checks. Enter all three into parts search tools rather than just the model name to avoid parts for previous or refreshed generations.
Model facelifts or platform updates can change mounting points, electrical connectors, or part dimensions even if the model name stays the same.
Check the vehicle’s production date against the part’s stated compatible years. If a part covers a range (e.g., 2015–2018), verify whether the car falls inside that range and whether any listed exceptions apply.
When possible, compare dimensions, bolt patterns, and connector types shown in the part spec sheet to the vehicle’s service manual.
Trim Level and Engine Variations
Trim level often determines equipment differences like brake sizes, suspension setups, or electronics. They should match trim-specific parts (e.g., sport brake rotors or premium audio components).
Engine variants matter for components such as intake manifolds, alternators, and wiring harnesses. A 2.0L turbo and a 2.0L naturally aspirated engine may look similar but use different parts.
Confirm part listings that specify trim codes (like “L,” “SE,” or “Sport”) or engine codes (e.g., “2ZR-FE,” “B48”) against the car’s documentation. If a listing lacks trim or engine detail, ask the seller for OEM numbers or a VIN-fitment check before purchase.
Evaluating Physical and Electrical Connections
Check how the part mounts and how its electrical plugs match the vehicle. Measure key dimensions, bolt patterns, and inspect pins and wire colors to confirm a proper fit and safe operation.
Mounting Points and Dimensions
They should compare the part’s bolt hole pattern, flange shape, and overall size to the original part. Measure center-to-center bolt spacing, stud diameter, and thickness. Note any offset or angled mounting surfaces that could change alignment.
Use a simple table to record measurements:
- Bolt spacing (mm): _____
- Stud/bolt diameter (mm): _____
- Flange thickness (mm): _____
- Overall length/width (mm): _____
Also check for mating surface finishes and gasket grooves. A mismatch in thickness or shape can cause leaks, vibration, or misalignment. If tolerances differ by more than a few millimeters, test-fit or consult manufacturer specs before installing.
Connector and Harness Compatibility
They must match connector shape, pin count, and pin functions, not just color. Inspect the plug housing for locking tabs and retention features. Confirm pin assignments with a wiring diagram or OEM connector guide.
Check wire gauge and insulation type; smaller gauge can overheat on high-current circuits. Use a multimeter to verify continuity and pin voltages before connecting. If pins differ, a plug adapter or repinning may work, but only if pins match current rating and sealing against moisture.
Utilizing Online Compatibility Resources
Users should verify fit by checking VIN or exact vehicle specs, confirm OEM or aftermarket part numbers, and review fitment notes and physical dimensions before buying.
Automotive Parts Databases
They offer centralized records linking part numbers, vehicle models, and fit years. Users can search by VIN, engine code, or part number to find matches and listed interchangeables.
Key checks to do: verify the exact year, engine, and trim; compare OEM numbers; and read any fitment notes that mention exceptions like facelift years or optional packages.
Many databases show bolt patterns, connector types, and dimensions. Users should copy critical specs (length, diameter, electrical connector) into a note and compare to the existing part.
Tips:
- Use VIN search when available to limit results to the exact build.
- Cross-reference at least two databases to catch errors.
- Save database pages or take screenshots as proof of compatibility.
Retailer and Manufacturer Fitment Tools
Retailers and OEM sites map parts to vehicles and often include guaranteed-fit policies. They let users enter VIN, make, model, and year to filter compatible parts instantly.
Users should watch for retailer notes about “may fit” versus “direct fit.” Manufacturer catalogs show superseded and updated part numbers and list service bulletins that affect fit.
Check the returns policy and any fitment guarantee before purchase. For electrical and engine components, confirm connector type and software or programming requirements listed on the product page.
Quick checklist:
- Enter VIN, not just year and model.
- Compare OEM part numbers shown by the tool.
- Note return and warranty terms in case the part does not fit.
Consulting With Certified Mechanics and Dealerships
They can confirm fitment using the vehicle’s VIN and OEM part numbers. This reduces the chance of ordering the wrong part, especially for mid-year or trim-specific changes.
Dealerships use factory databases that match exact assemblies and serial ranges. Technicians can check service records and recall notices that affect compatibility.
Certified mechanics often perform a physical inspection to verify dimensions and bolt patterns. They can also test related systems to ensure the replacement part will work as intended.
Ask for written part numbers and compatibility notes before buying. A clear reference helps when ordering online or returning a mismatched item.
Use questions like:
- “Can you verify this part by VIN?”
- “Is this the OEM number or an aftermarket equivalent?”
- “Are there known fitment issues for my trim?”
Dealership pricing may be higher, but they offer guaranteed OEM fit. Independent shops may save money and provide practical fit checks.
Request documentation of labor and parts compatibility if a shop installs the item. This protects the buyer if the part fails or does not fit as expected.
Testing Parts Before Final Installation
Test the part on the vehicle and inspect connections, fasteners, and clearances. Use basic tools and simple checks to confirm fit and function before committing to full installation.
Trial Fitting Techniques
They should mount the part loosely first to check alignment and access. Bolt the part in place without fully tightening fasteners, then cycle moving components (steering, suspension, or doors) to verify no rubbing or binding occurs.
Measure critical dimensions with a tape or caliper: bolt hole spacing, flange thickness, and overall length. Compare those numbers to the old part or the vehicle’s service manual.
For electrical parts, connect harnesses and use a multimeter to confirm voltage, continuity, and ground. If possible, power the component briefly while supported on a bench to verify operation before installation.
Use masking tape or a marker to note trim contact points and test-fit any seals or gaskets dry to ensure they seat correctly. If the part needs adapters, test-fit adapters and check torque clearances before final assembly.
Common Signs of Poor Compatibility
They should watch for misaligned bolt holes, uneven gaps, or forced fits. If bolts cross-thread or holes require drilling, the part likely does not match and can cause failure.
Listen for unusual noises when cycling parts: creaks, clunks, or scraping often signal incorrect geometry. For electrical parts, flickering lights, blown fuses, or abnormal current draw indicate mismatched connectors or wrong voltage.
Check for fluid leaks at seals and hoses after a pressure or hand-tight test. Visible stress marks, warped flanges, or rapid wear on adjacent components also point to incompatibility.
If any of these signs appear, stop installation and re-check part numbers, VIN data, or consult the OEM catalog before proceeding.
Warranty and Return Policy Implications
They should always check warranty terms before buying a part. Warranties can cover defects, fitment issues, or premature failure. Some only apply to OEM parts and exclude aftermarket replacements.
If a part causes damage, warranty and insurance claims may be affected. Manufacturers and insurers often look for certified parts and proper installation. Using non-approved components can lead to denied claims or reduced coverage.
Return windows and restocking fees matter for fitment mistakes. Short return periods or high restocking charges raise the cost of a wrong order. Buyers should note who pays return shipping and whether seals must remain intact.
A simple checklist helps when evaluating policies:
- Length of coverage (months/years)
- What is covered (defects, labor, fit)
- Exclusions (aftermarket, used parts)
- Return window & fees
- Required proof (receipts, installation records)
They should keep documentation for every purchase and install. Receipts, OEM numbers, and installer invoices make claims easier. Photographs of the part and vehicle before and after installation also help if a dispute arises.
When possible, choose suppliers with clear warranties and fair returns. Reputable sellers often offer longer warranties and easier returns. That reduces financial risk if a part turns out incompatible.
Addressing Common Compatibility Challenges
This section helps readers solve two frequent problems: finding parts that are no longer made and adapting parts for custom or modified vehicles. It lists practical checks and steps to avoid mistakes and wasted money.
Obsolete or Hard-to-Find Parts
When a part is discontinued, they should start by searching OEM part numbers and VIN-based databases. Salvage yards, specialist forums, and club classifieds often hold exact matches for rare parts.
They should also verify part numbers against service manuals or parts diagrams to avoid close-but-incompatible substitutes.
If exact parts cannot be found, consider remanufactured or aftermarket equivalents that list compatible VINs or chassis codes. Confirm material and fit specs like mounting points, electrical connectors, and lubrication needs before buying.
Keep a record of seller return policies and measure the old part to match dimensions. Small differences in bolt spacing or electrical harnesses can cause failure.
Modifications for Custom Builds
For modified cars, compatibility depends on clear measurements and functional goals. They must list target upgrades (engine swap, suspension, turbo) and compare bolt patterns, driveshaft lengths, ECU pinouts, and cooling capacity.
Using mock-up templates or test-fits reduces surprises. For wiring changes, they should map circuits and use labeled connectors or adapter harnesses to retain safety features.
They should check legal and safety rules: emissions, brake standards, and VIN plate changes. If unsure, consulting a shop that specializes in the chosen modification saves time.
Documenting all changes and keeping original parts helps with resale and troubleshooting.
FAQs
| Question | Answer |
|---|---|
| How can they confirm a part fits their car? | They should check the VIN, OEM part number, or engine code. Online fitment tools and manufacturer catalogs can confirm matches quickly. |
| Can parts from different model years be used? | Some parts cross over between years. They must verify year-specific changes like engine updates or body revisions before buying. |
| Are aftermarket parts safe to use? | Quality varies. They should choose reputable brands and check warranties, reviews, and certifications. |
| What if the part number is missing or worn off? | They can compare dimensions, mounting points, and electrical connectors. A dealer or mechanic can help identify the correct replacement. |
| How reliable are online compatibility checkers? | Many are accurate when given the correct VIN or vehicle details. They can still show errors, so users should confirm with OEM data or a trusted parts supplier. |
| Should they return a mismatched part? | Yes. They should check the seller’s return policy before purchase and keep receipts and part numbers for a smooth return. |
Common quick checks include matching the VIN, checking OEM numbers, and comparing physical fit. They should document the old part and take photos when possible.
Conclusion
They should always confirm fitment before buying. Using VIN lookups, OEM or part numbers, and vehicle specs cuts guesswork and reduces returns.
They can cross-check parts on OEM sites, reputable aftermarket catalogs, and vehicle forums. Professional advice helps for complex systems like engines and transmissions.
A quick checklist helps prevent mistakes:
- Verify VIN or model year.
- Match OEM/part numbers.
- Check physical measurements and electrical connectors.
- Read fitment notes and return policies.
When in doubt, they should choose parts with clear fitment data or buy from sellers who accept returns. Proper documentation and photos of the old part make exchanges smoother.
Following these steps saves time and money. It also keeps the vehicle safe and reliable.